Just like you, many smartphone users are wondering What is ADB Sideload on Android install ROM with ADB. No worries, because in this article, that is what we are going to clarify, pointing out each step regarding the Sideload.
It might appear like Sideloading on Android is a bit of a tricky and risky thing to do. With Sideloading, a user puts their Android phone in a boot loader mode when they first turn on the phone.
After that, they will get the chance to install any custom OS on Android. These custom OS usually are what differentiates the regular Android OS from a custom Android ROM.
You may have thought that performing this ADB Sideload needs technical expertise. Well, it requires but not an average person like you and me can do it on their own.
What Is ADB Sideload Firmware Or Android Debug Bridge Sideload?
Android Debug Bridge or ADB is actually an Android authorized command-line tool just like Fastboot. It enables us to run exclusive commands to our Android devices by connecting them to a personal computer. And that allows us to do some necessary tasks such as transferring files.
ADB Sideload, on the other hand, has a step ahead explanation. It is indeed the command to initiate the transferring operation. You can transfer Android stock installation files, for example, zipped ones, and install it to your device. And all of this can be done through your computer.
What Are The ADB Sideload Command-List?
The particular ADB Sideload command that we are going to use in this Android guide is “ADB sideload filename.” This command will allow you to install the required zip file from the ADB command shell.
How To Perform ADB Sideload TWRP Recovery?
Undoubtedly, ADB Sideload has some significant aids in TWRP. Though this is only limited to zipped files actions. In the case of the stock recovery operation, zipped files are usually considered as an updated firmware.
On the flip side, TWRP recovery with ADB Sideloads moulds into different scenes. Consider the typical Magisk module as an example or count on Custom ROM.
Remember that both stock recovery and TWRP recovery processes are almost similar. If you don’t know the method of ADB Sideload before, continue reading this article to learn the step-by-step guidance.
Note: Before you begin, keep in mind that if you don’t have an Android smartphone, you can’t use the ADB Sideload using the ADB tool. The same condition goes for if you are willing to utilize a program like Odin.
If you have already ended up with a rooted ROM, you should know that flashing an AOSP ROM with the ADB Sideload on the Android tool will prevent you from reverting to a factory ROM.
apply update from ADB on the android device manually setup
Step 1: Installing ADB On Your Computer
At the beginning of this step, you just need to download the Android SDK Platform-tools on your computer. The toolset is officially distributed by Android (Google) for the ABD and Fastboot binary-related actions. how to adb sideload a rom
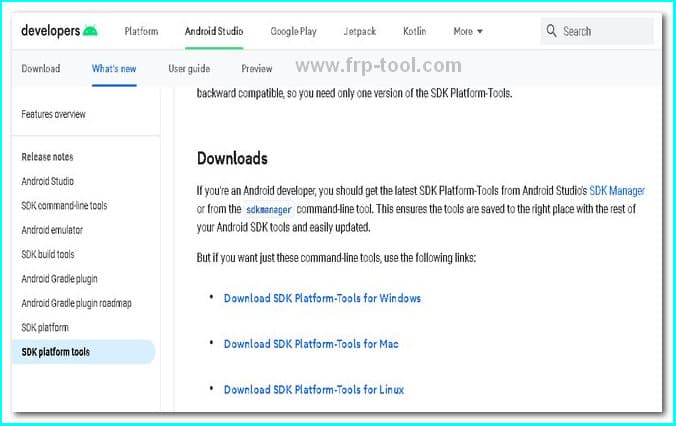
Since it is a zipped file, make sure to extract it in your preferred file directory after download. The extracted folder is what we are going to use for flashing Zip with ADB sideload and TWRP.
Step 2: Unlocking The Bootloader
For installing the custom ROM recovery such as TWRP, you have to unlock your smartphone’s bootloader first. The caution you should keep in mind here is to wipe out all data from your smartphone. adb reboot device
Alongside this, the manufacturer warranty will be void. Use the power on/off button and volume key to set your phone in boot mode.
Step 3: Installing The TWRP Recovery
Go to the TWRP Recovery download page and search for your device to get yours. If, for any chance, you can’t find your smartphone brand there, try the unofficial XDA tools for the purpose.
After the TWRP recovery file is downloaded, follow the instruction given on the installation wizard to get it installed properly.
ADB push filename.zip /sdcard/
Step 4: Booting Your Device To TWRP Recovery
Now use a USB cable to connect your phone to your computer. Before that, make sure that you have enabled the USB Debugging mode on your phone.
Then go to the platform-tools directory, enter CMD in the address section, and hit the Ok or Enter key.
It will automatically launch the command window. Then type the code there: “adb reboot recovery.”
Wait a moment because this action will boot the device in TWRP Recovery. At the next step, you have to flash the zipped file through TWRP and ADB Sideload.
Step 5: Rooting The Phone
Well, this step is an additional one. Depending on the zipped file you have for the recovery purpose, you might need to follow this step to flash via TWRP and ADB sideload. Remember that in the case of custom ROM, there is no need to root your smartphone.
However, when flashing a Magisk module, then you must go through this rooting process.
Step 6: Installation Process Of Zip File Via TWRP ADB Sideload
Just follow the below steps to get it done in the right way.
- Track the zipped file and then transfer it to your platform-tools directory from your computer.
You can also rename the file name to easily trace afterwards whenever you need it. For, example name it “mod.” It will also help you to type the file name in the command window later.
- Open the Command Prompt window by searching with “CMD” in the address bar under this folder.
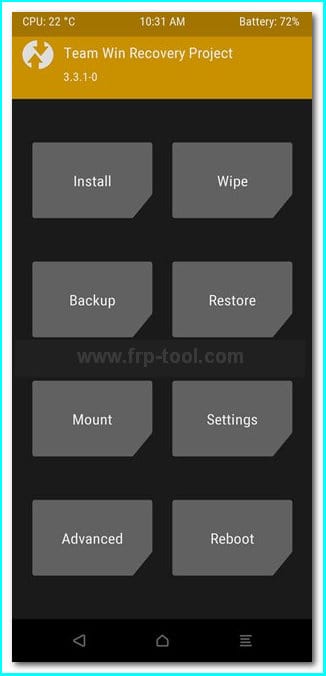
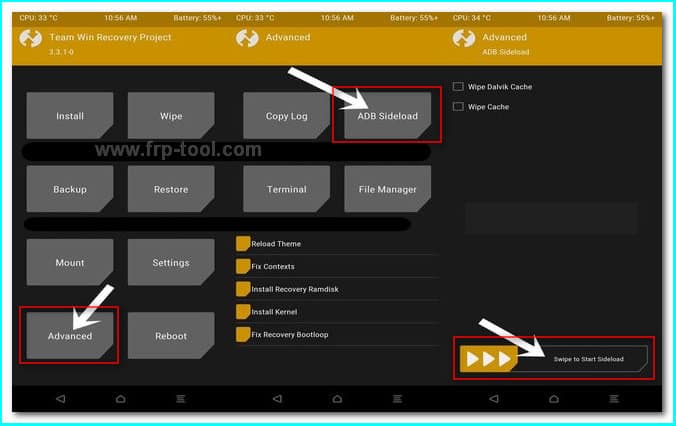
- Head over to TWRP’s home window, then select Advanced and then ADB Sideload.
- Swipe right to the Start Sideload button from Swipe that is located at the bottom edge of the screen.
- Now, you have to hop onto the command prompt window again and type the following command there. (adb sideload mod.zip) Click on Enter
- Android debug bridge version 1.0.32
Note: (mod.zip) is the file name that we have created earlier in the process. If you have named it differently, just enter that with .zip.
- After the input, the flashing process will be started. When it is finished, make sure to reboot your smartphone without moving further. Do it through Reboot > System in the TWRP menu.
FAQ
Does ADB Sideload Wipe Data?
Usually, the ADB Sideload turns your phone or tablets into factory reset or FRP mode. It is often witnessed in Nexus devices, even if you try a simple command such as “adb” only. However, some Android smartphones having Android 5 or upgrader OS might not lose your data.
Yet, there is a chance that the ADB Sideload will wipe out all your phone data. Make sure to back those up before running the operation.
Why Is ADB Device Not Found?
This often happens when you are trying to perform ADB Sideload recovery. Your computer screams with a popup that says, “ADB device not found.” In that case, the problem is lying in your ADB device driver set.
If you witness the issue, uninstall the existing ADB driver set and reinstall the upgraded version from their website.
Closure
That is all about What is ADB Sideload On Android install ROM with ADB. Hopefully, this guide is going to help you more than you expected. The important note is here is that you can try ADB Sideloading in both custom and stock TWRP Recovery.
As we have tried to simplify the whole process by keeping ordinary people in mind, you are not supposed to face any complications.
However, if you find anything that requires our assistance, feel free to buzz through the comment box. We will then get back to you or come up with another solution regarding your concern. Till then, chill with your tech gigs and stay home.